Experiencing a slow website can be incredibly frustrating. After assisting thousands of Canada Create™ readers in improving their site speeds, we’ve identified a common issue: large, unoptimized images.
Many website owners fear that reducing their image sizes will result in blurry and unprofessional visuals. We understand this concern. Fortunately, you don’t have to compromise between fast-loading pages and stunning, high-quality images.
We have developed a straightforward image optimization process that we apply to all our websites. This guide will provide you with easy-to-follow, beginner-friendly steps. You’ll discover how to reduce image sizes without losing quality.
As this is a thorough guide on web image optimization, we’ve created a user-friendly table of contents:
- Understanding Image Optimization
- Benefits of Image Optimization
- How to Save and Optimize Images for Better Web Performance
- Top Image Optimization Tools and Software
- Best Image Optimization Plugins for WordPress
- Conclusion and Best Practices for Image Optimization
- Video Guide
- Common Questions About Image Optimization
- Additional Resources for Enhancing WordPress Performance
1. What Is Image Optimization?
Image optimization involves reducing the file size of images while maintaining their quality, ensuring quick loading times for your website.
Although it may seem complicated, image optimization is straightforward today. Numerous plugins and tools can automatically compress images by up to 80% without compromising their visual quality.
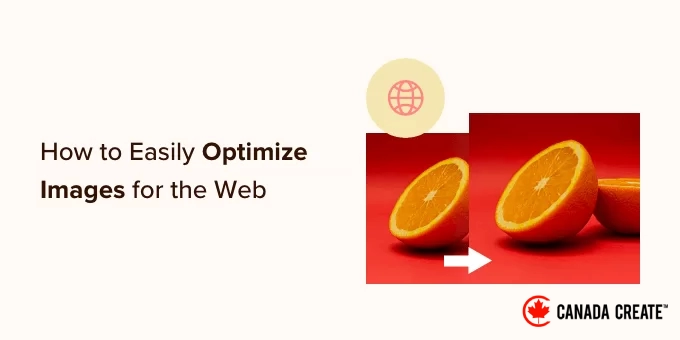
Here’s a comparison between an optimized image and an unoptimized one:
When optimized correctly, an image can be reduced in size by up to 80% without any quality loss. In this case, the optimized image is 52% smaller than the original.
How Does Image Optimization Work?
Essentially, image optimization utilizes compression technology to reduce file sizes.
Compression can be categorized as either ‘lossy’ or ‘lossless’.
Lossless compression decreases file size without any loss in image quality, while lossy compression may result in slight quality reduction, which typically goes unnoticed by users.
What Does It Mean to Optimize Images?
If you’ve been advised to optimize images by your WordPress hosting support or a speed test tool, you might be wondering what steps to take.
To enhance your website’s performance, it’s essential to optimize your images by reducing their file sizes. We will guide you through the process step-by-step.
2. What Are the Advantages of Image Optimization?
Optimizing your images offers numerous advantages. Here are the key benefits you should be aware of:
- Increased website loading speed
- Enhanced SEO performance
- Higher conversion rates for sales and leads
- Reduced storage and bandwidth usage, leading to lower hosting and CDN expenses
- Quicker website backups, which can lower backup storage costs
Images are the second heaviest element on a webpage, following videos. According to the HTTP archive,images often constitute the largest share of a page’s total file size.
Given that fast-loading websites achieve higher rankings in search engines and enjoy better conversion rates, image optimization is crucial for any business aiming for online success.
You may be curious about the actual impact of image optimization.
A pivotal study by Strangeloop revealed that a one-second delay in page load time could result in a 7% drop in sales, 11% fewer page views, and a 16% decline in customer satisfaction. With rising user expectations today, the effects are even more pronounced.
If you need more reasons to enhance your website’s speed, consider that search engines like Google prioritize faster-loading sites in their SEO rankings.
By optimizing your images for the web, you can enhance your website’s loading speed and improve your WordPress SEO rankings simultaneously.
3. How to Save and Optimize Images for Better Web Performance
Successful image optimization for web performance hinges on achieving the ideal balance between the smallest file size and acceptable image quality.
Three key factors significantly influence image optimization:
- Image file format (JPEG, PNG, or GIF)
- Compression level (higher compression results in smaller file sizes)
- Image dimensions (height and width)
By selecting the right combination of these three factors, you can reduce your image size by up to 80%.
Let’s explore each of these factors in more detail.
1. Image File Format
For most website owners, the three essential image file formats are JPEG, PNG, and GIF. Choosing the appropriate file type is crucial for effective image optimization.
To simplify, use JPEGs for photographs or images with many colors, PNGs for simple or transparent images, and GIFs exclusively for animated images.
Understanding the differences between image file types is essential.
- The PNG format employs lossless compression, allowing for reduced file sizes without sacrificing quality. This makes it ideal for logos, graphics with text, and images requiring sharp lines and transparency.
- Conversely, JPEG is a compressed format that sacrifices some image quality to achieve a much smaller file size.
- GIF format is limited to 256 colors and uses lossless compression, making it suitable for animated images.
At Canada Create™, we utilize a combination of these formats. However, many contemporary websites are adopting the WebP format, which often delivers superior compression compared to JPEG and PNG, resulting in smaller files without compromising quality. Most modern browsers support WebP, and numerous optimization plugins can automatically convert images to WebP, significantly enhancing loading speeds.
To learn more about image formats, check out our guide comparing WebP, PNG, and JPEG to determine the best image format for WordPress.
2. Image Compression
Image compression is a critical factor in optimizing images.
Various types and levels of image compression exist, and the settings will differ based on the image compression tool you are using.
Many image editing software options, such as Adobe Photoshop, ON1 Photo, GIMP, and Affinity Photo, come equipped with built-in image compression tools.
Alternatively, you can save images in their original format and then utilize online tools like TinyPNG or JPEGmini for efficient image compression.
While these methods require some manual input, they enable you to compress images prior to uploading them to WordPress, which is our approach at Canada Create™.
Additionally, there are several popular WordPress plugins, such as Optimole and EWWW Image Optimizer, that can automatically compress images upon upload. This feature is convenient and is favored by many beginners as well as large companies.
We will provide more details on utilizing WordPress plugins later in this article.
3. Image Dimensions
Typically, when you import a photo from your smartphone or digital camera, it comes with a very high resolution and large file dimensions (both height and width).
Photos taken with smartphones or digital cameras often have large pixel dimensions (for example, 4000 pixels wide) and may be set to a resolution of 300 DPI.
Here’s an important tip for web images: you can disregard DPI entirely. This setting is relevant for printing. For web use, the only factors that matter are the pixel dimensions (height and width).
Resizing images to more manageable dimensions can greatly reduce file size. You can easily adjust image sizes using editing software available on your computer.
For instance, we started with a photo that had large original dimensions of 4900×3200 pixels, resulting in an initial file size of 1.8 MB.
We opted for the JPEG format for better compression and resized the image to 1200×795 pixels, bringing the file size down to just 103 KB. This is a remarkable 94% reduction from the original size.
Now that you understand the key factors in image optimization, let’s explore various tools available for website owners to enhance their images.
4. Top Image Optimization Tools and Software
As previously mentioned, most image editing programs include settings for image optimization and compression.
In addition to image editing software, there are several effective free tools available online that allow you to optimize images for the web with just a few clicks.
We highly recommend using these tools to optimize your images before uploading them to WordPress, particularly if you have high standards.
This approach helps conserve disk space on your WordPress hosting account and ensures that you have the fastest images with the best quality, as you can manually review each image.
Adobe Photoshop
Adobe Photoshop is a leading image editing software that allows you to export images optimized for the web with reduced file sizes.
In the export dialog, you can select from various image formats (JPG, PNG, GIF) to achieve the smallest file size.
Additionally, you can adjust image quality, color depth, and other settings to further minimize file size.
GIMP
GIMP is a free and open-source image editing tool that serves as an alternative to Adobe Photoshop, enabling you to optimize images for web use. However, it may not be as user-friendly as some other options available.
To begin, open your image in GIMP and navigate to the File » Export As… option. This will open the Export Image dialog box, allowing you to rename your file. Then, click the ‘Export’ button.
You will now see various export options for your image. For JPEG files, use the ‘Quality’ slider to adjust the compression level and reduce the file size.
Finally, click on the ‘Export’ button to save your optimized image file.
TinyPNG
TinyPNG is a free online tool that employs advanced lossy compression techniques to shrink the size of your PNG and JPEG images. Simply visit their website and upload your images using an easy drag-and-drop interface.
They will compress your images and provide a download link.
They also offer an Adobe Photoshop extension, which we utilize in our image editing workflow, allowing access to TinyPNG directly within Photoshop.
For developers, they provide an API for automatic image conversion. Additionally, beginners can use their WordPress plugin for easy optimization, which we will discuss further later.
JPEGmini
JPEGmini employs advanced lossy compression technology to significantly reduce image file sizes while maintaining visual quality. You can compare the original image with the compressed version to evaluate the results yourself.
You can use their web version for free or purchase the desktop application. They also offer a paid API for automating the process on your server.
ImageOptim
ImageOptim is a Mac application that compresses images without sacrificing quality by optimizing compression settings and removing unnecessary color profiles.
For Windows users, Trimage serves as a suitable alternative.
5. Top Image Optimization Plugins for WordPress
To achieve the best image optimization, it’s ideal to compress your images before uploading them to WordPress. However, if you manage a multi-author site or require an automated approach, consider using a WordPress image compression plugin.
Here are our top recommendations for WordPress image compression plugins:
- Optimole, a widely-used plugin developed by the ThemeIsle team
- EWWW Image Optimizer
- JPEG, PNG & WebP Image Compression, a plugin created by the TinyPNG team mentioned earlier
- Imagify, a plugin from the well-known WP Rocket team
- ShortPixel Image Optimizer
- Smush
- reSmush.it
- Envira Gallery is a WordPress gallery plugin that includes built-in image compression
These WordPress image optimization plugins will enhance your website’s speed.
6. Conclusion and Best Practices for Image Optimization
If you aren’t currently saving images optimized for the web, it’s time to start. This change will significantly improve your site speed, and your users will appreciate it.
Additionally, faster websites are beneficial for SEO, and you may notice an improvement in your search engine rankings.
In addition to optimizing images, two key strategies to enhance your website’s speed are utilizing a WordPress caching plugin and implementing a WordPress CDN.
At Canada Create™, we prefer WP Rocket for its robust combination of caching and image optimization features, including lazy loading (which ensures images load only when users scroll to them) and support for WebP format, all in one convenient package.
If you are using the Envira Gallery plugin, we highly recommend their Envira CDN service. This image-focused CDN dramatically speeds up your photo galleries without the hassle of a traditional CDN setup.
Alternatively, consider using a managed WordPress hosting provider, as they typically include both caching and CDN services within their offerings.
Common Questions About Image Optimization
Throughout our experience assisting users in enhancing their website speed, we have addressed numerous inquiries regarding image optimization. Below are answers to some of the most frequently asked questions.
1. What is the optimal image format for web use?
The best image format depends on the type of image. For colorful photographs, JPEG is typically the preferred format. For simple graphics, logos, or images that need a transparent background, PNG is the best choice. GIFs are suitable only for animated images. The newer WebP format is also a fantastic option, offering high quality with smaller file sizes.
Does optimizing images affect their quality?
Not necessarily. ‘Lossless’ compression reduces file size without any loss of quality. Even with ‘lossy’ compression, the aim is to strike a balance where the file size is significantly smaller, but any quality changes are nearly imperceptible.
What is an ideal file size for web images?
There isn’t a one-size-fits-all answer, but a good target for most images is to keep them under 150 KB. For larger, full-width images, you might go up to 500 KB. The primary objective is to achieve the smallest file size possible while ensuring the image remains sharp and clear on your website.
How does image optimization enhance SEO?
Search engines like Google consider page speed as a ranking factor. Since images are often the largest files on a webpage, optimizing them helps your site load faster. This increase in speed can lead to improved SEO rankings and a better experience for your visitors.
5. Is it possible to optimize images that are already uploaded to WordPress?
Absolutely. Many image optimization plugins for WordPress offer a ‘bulk optimization’ feature. This tool can analyze your entire media library and compress all existing images, making it ideal for enhancing the speed of an established website.
Additional Resources for Enhancing WordPress Performance
We hope this article has helped you understand how to optimize your images in WordPress. You may also find these related articles useful for improving WordPress performance:
- The Comprehensive Guide to Enhancing WordPress Speed and Performance
- Strategies to Accelerate WooCommerce Performance
- How to Offload WordPress Media for Improved Website Speed
- Top WordPress Caching Plugins to Accelerate Your Website
- Ultimate Guide to Optimizing Core Web Vitals for WordPress
- Expert Tips for Reducing Time to First Byte (TTFB) in WordPress
- Using GTmetrix Plugin to Enhance WordPress Site Performance
- Fastest WordPress Hosting: Performance Comparisons
- Key Metrics to Monitor on Your WordPress Site
- How to Effectively Conduct a Website Speed Test
- How to Perform a Stress Test on a WordPress Website
If you enjoyed this article, consider subscribing to our YouTube Channel for insightful WordPress video tutorials. Connect with us on Twitter and Facebook for more updates.